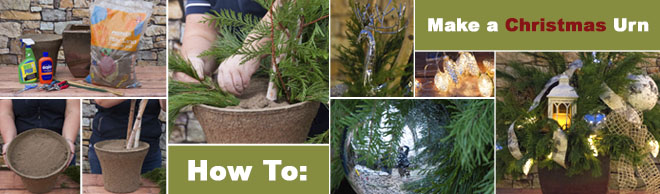
How to Make Your Own Christmas Urn
By Rob Sproule
If there is any truth in the expression “absence makes the heart grow fonder,” it may help to explain the intensity of the love affair that we Albertans have with our gardens. As we cloister together in our centrally heated homes through the depth of winter, we’re increasingly finding ways to make our outdoor spaces just a little less lifeless.
Every Fall we haul our big pots away from our front door and into garages and sheds. To me, this is a white flag to winter that it can cover our entire outdoors in white cold nastiness. Why not keep the pots where they are, top them up with sand and cheat winter by flaunting a fresh evergreen container that will last through the holidays until early spring. The Magic of Evergreens
Instead of staying trapped indoors like a besieged army is at our gates, let’s get out and reclaim our porches, patios and doorways and fill them with life.
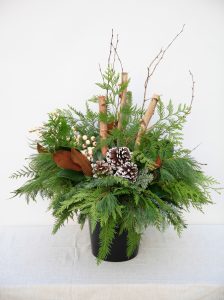
Classics at Christmas, evergreen containers can easily be “De-Christmasized” for visual appeal until the March thaw. While they look like only a florist can put them together, the fact is that anyone can make their own for a fraction of what it costs to have them professionally made. Christmas Container Gardening
Materials Needed
While you’ll have a lot of freedom in the decor you can use for finishing touches, the basics you’ll need for your container are fairly tried and true. Load up with about 8 bundles of western red cedar, pine, silver fir, blueberry cedar, and juniper for a 16″ ish diameter container. Plan to give or take a bundle for every 2 inches diameter if the pot is bigger or smaller.
You’ll also need some sharp pruners. Treat your evergreen branches like cut flowers, snipping a good inch off the bottoms at a 45 degree angle, which will make it easier to jab it into the sand. Grab a big bag of play sand and, if you want to tie balls and cones to sticks, some cheap bamboo stakes, florist wire and wire cutters.
You might get a little sticky doing this. While this means your greens are fresh, it can also be annoying. If you’re sensitive to sap, or if you just don’t want it on your fingers, make sure to wear gloves. Personally, I think the smell of evergreens on my hands is worth the stickiness.
Creation Basics
Play sand is the best medium to use because it’s fine enough that you can jab branches into it but dense and heavy enough to hold them in place, especially when wet and frozen. If your containers are already half full of spring soil, save some money by keeping the soil in and heaping the sand overtop. You’ll need 8-12″ of sand for a solid grip.
Central branches will add a potent vertical aspect. While the loop-de-looping curly willow used to be in vogue, many people I talk to lately are gravitating towards the clean, straight lines of dogwood and birch. If you’re using blunt-ended branches (like birch poles), place them first and pack the sand around them. 3 poles, angled slightly outwards and at various heights, will look the best from a design point of view.
In an evergreen container everything flows from the centre, so start jabbing your ingredients in the middle. Begin with the tallest cedar, pine, and fir, selecting robust stems that won’t flop over. Spiral your way outwards, alternating the types of green you use as using progressively shorter, floppier stems. Think about your final shape before getting too far along; do you want a classical pyramidal shaped look or a more contemporary, off-set container with room for decor?
Take time for perspective. Step back periodically and walk around your creation, making sure you like the shape and feel of it. If you don’t then rip some out and jab that section in again.
Decorating your Container
Once you’ve “greened” your container and you’re happy with the basic shape of it, it’s time to break out the bling! There’s no shortage of this on offer at Garden Centres, from red berries (real or fake) to cones on sticks, flameless candles, balls, bows, birdhouses, reindeer and Santa Clauses. It’s personal preference from here on in.
It’s easy to turn cheap Christmas balls or big cones into container ornaments by tying or gluing bamboo stakes onto them and jabbing them in like the evergreen branches. Keeners can tie bows onto the branches and adorn the container with larger decorations to add visual “oomph.” Wicker balls work beautifully for a rustic, natural look. They’re cheap and easy to tie onto stakes or even evergreen branches.
If you want to go a step further in battling the forces of winter, drape outdoor lights through the greenery. You can hook them up to a timer to make sure they greet you when you get home from work, just make sure they’re cool LED and not a fire-hazard.